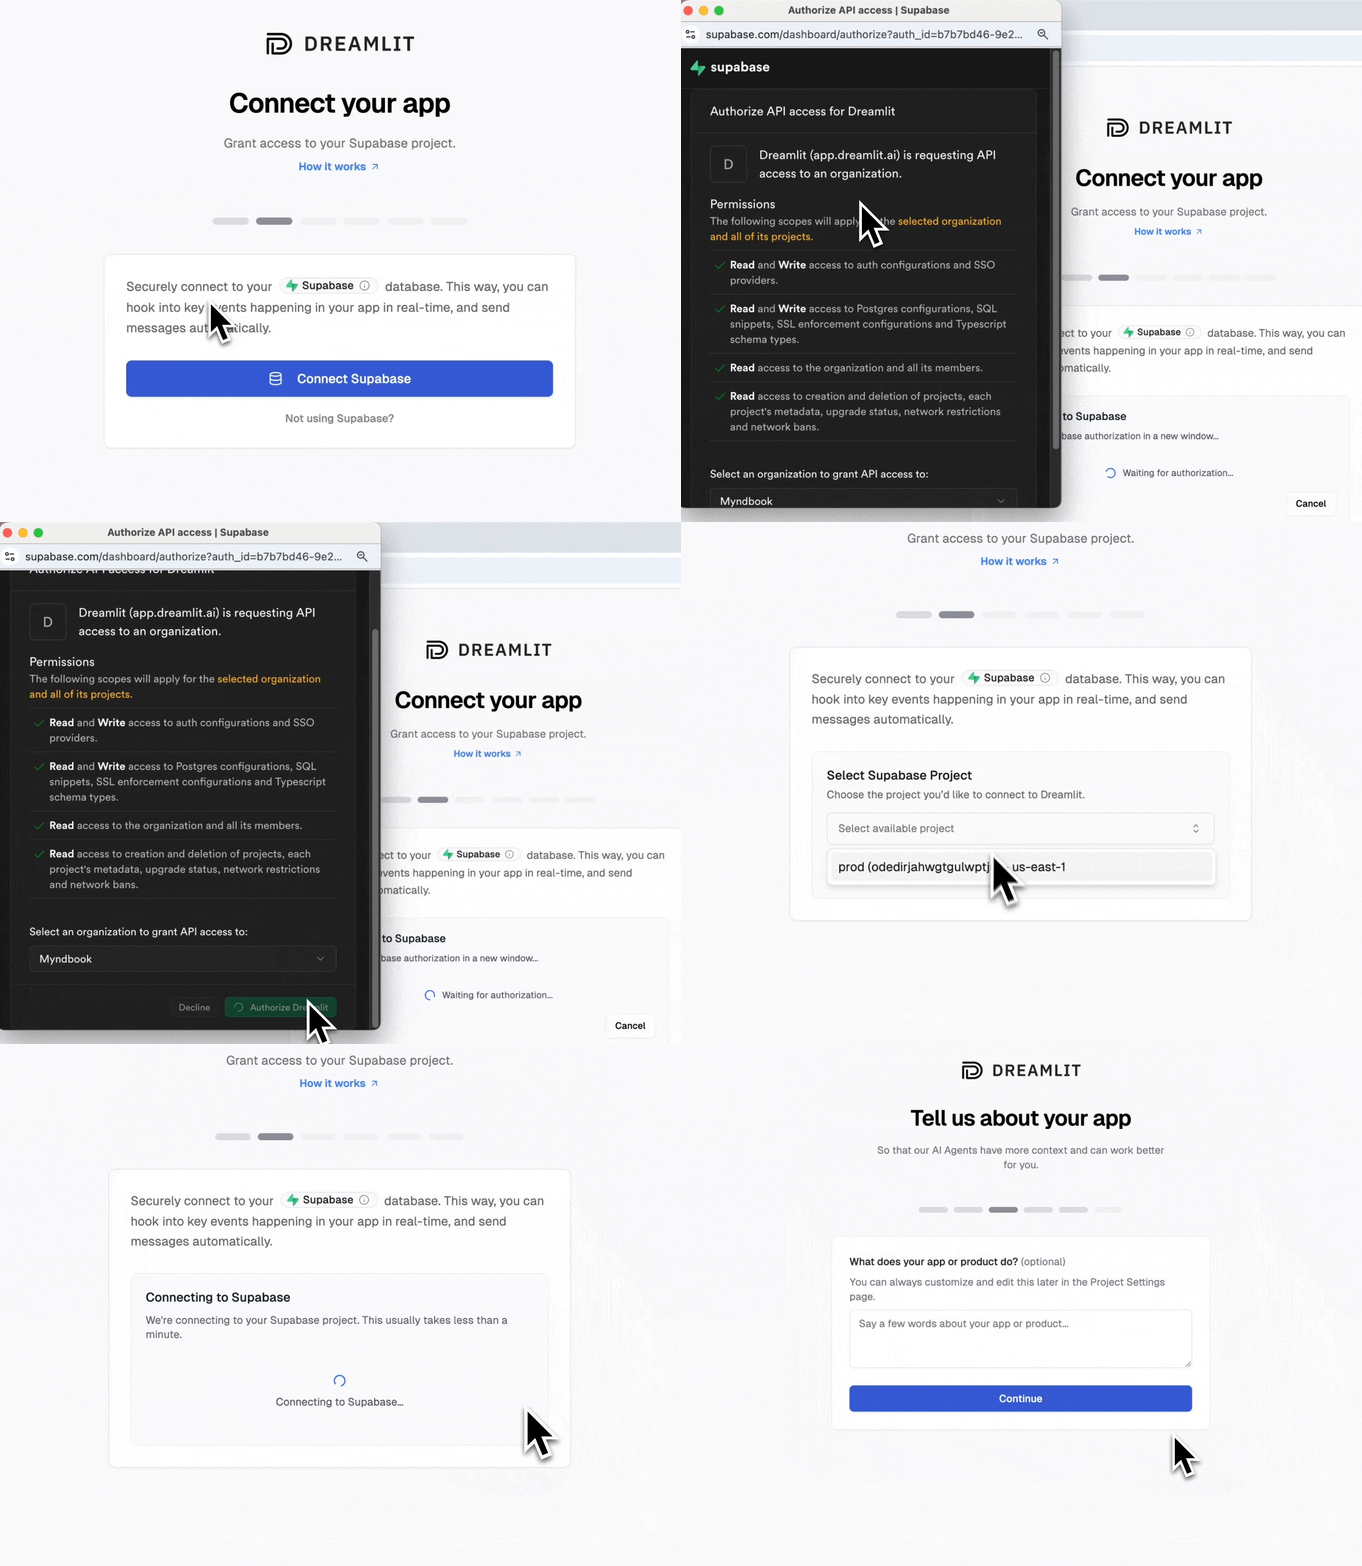
Behind the scenes, this authorization flow creates a separate
dreamlit_app database user (following best practices of isolation and least privilege) that Dreamlit uses to connect to your database and manage your workflows.You can always revoke Dreamlit’s access by deleting the connection in the Dreamlit dashboard or by dropping the dreamlit_app database user in your database.Dreamlit takes security seriously. To review all the measures we take, see Security.
Supabase Auth emails
Supabase Auth email setup is available only when your database connection is Supabase-managed (connected via Supabase Connect). The default Supabase Auth configuration is not production-ready. This means if you’re using Supabase Auth for user authentication, you’ll need to set up a proper email sender for all your auth emails—otherwise your users will not receive these critical emails from your app.What is Supabase Auth and do I need to configure it for my project?
What is Supabase Auth and do I need to configure it for my project?
You need custom auth emails if you’re using any of the following authentication methods:
- Email and password accounts
- Passwordless login (magic links or OTP sent via email)
- Email-based user invitations (from dashboard or admin APIs)
- Social login with email confirmation
- User sign-up with email verification
- “Forgot password” functionality
- Account email changes that require confirmation
- Admin-invited users who receive invitation links
- Passwordless login where users click a link in their email
Why aren't Supabase's default auth emails production-ready?
Why aren't Supabase's default auth emails production-ready?
Supabase default auth setup is intended for:
- Exploring and getting started with Supabase Auth
- Testing templates with team members
- Toy projects, demos, or non-critical applications
- Blocks real users: Emails only go to addresses in your project’s team (managed in organization settings)
- Error for everyone else: Non-team addresses fail with “Email address not authorized”
- Example: If your team has 3 members, only those 3 email addresses can receive auth emails
- Currently limited to 4 emails per hour (can change without notice)
- This means only 4 password resets, sign-ups, or magic links per hour for your entire app
- Rate limits are subject to change at Supabase’s discretion
- Sends from
[email protected](runs the risk of being marked as spam)
- No SLA for delivery or uptime
- Provided as “best-effort” only
- Explicitly stated as not for production use
How do people generally setup a custom email sender for Supabase Auth?
How do people generally setup a custom email sender for Supabase Auth?
Supabase provides two options for configuring email sending for Supabase Auth:
Configure SMTP
Setup: Add SMTP credentials in Supabase dashboardPros: Easier to get going compared with Auth HooksCons: Still uses Supabase’s basic templates, and must be customized in the Supabase dashboard (with no AI). Limited to their template variables. Must manage SMTP credentials.
Setup Auth Hooks
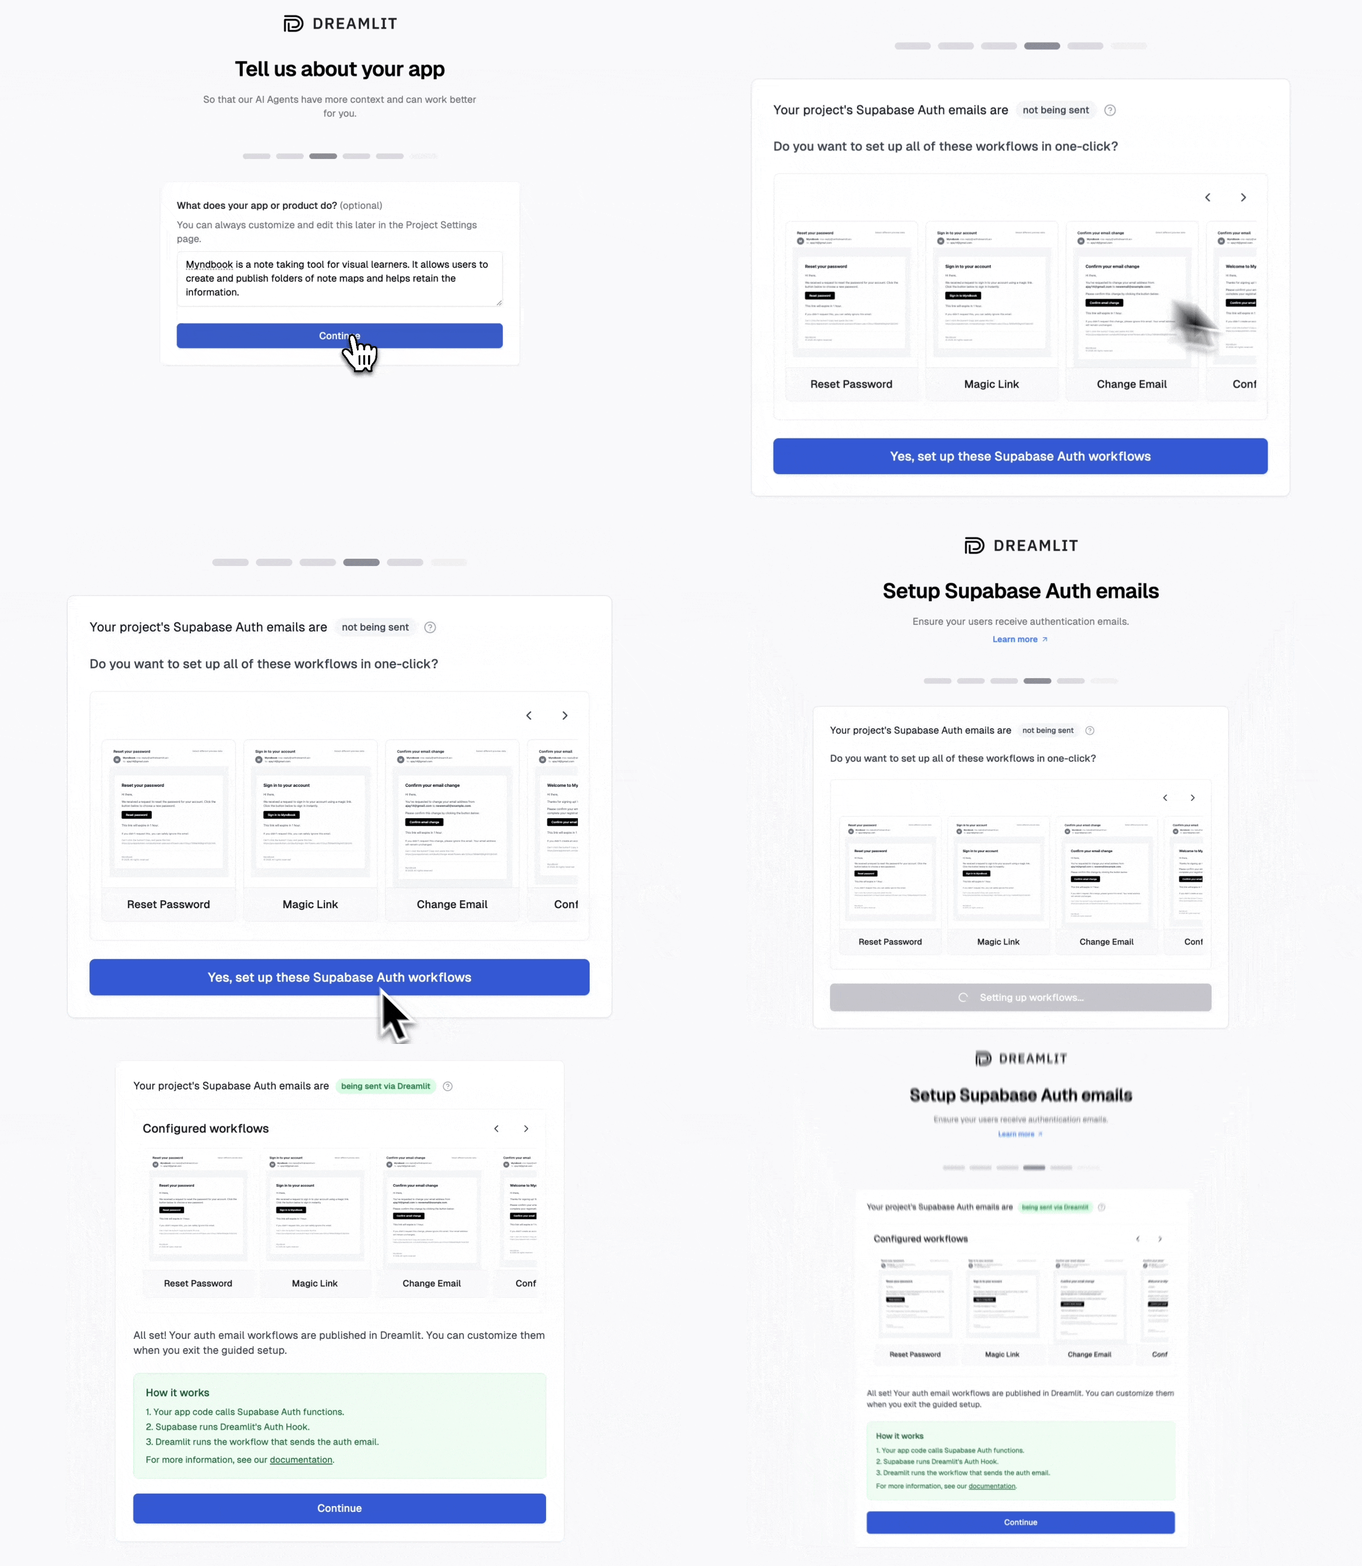
Setup: Write and deploy webhook endpointsPros: Full control over emailsCons: Requires backend development. Must handle email sending logic. Need to manage infrastructure. Complex error handling and retriesThis is the approach that Dreamlit takes - but handles all the complexity for you behind the scenes. Simply authorize your Supabase project with Dreamlit, and click “Setup Supabase Auth”.
Setup
It’s just one more click to ensure your users are receiving auth emails. Dreamlit handles all the complexity for you behind the scenes.
- Setup a Supabase Auth Hook for your Supabase project. The hook invokes a tiny custom Dreamlit managed function that simply logs the email event to the
dreamlit.event_logtable, allowing Dreamlit to start monitoring this event and trigger the appropriate workflow. - Automatically create and publish 6 workflows for you in Dreamlit, one for each of the auth email types in Supabase Auth (password reset, magic link, reauthentication, email change, confirm email, and invite link) that respond to the email events triggered by the auth hook.
- Generate beautiful default templates branded with your app name and sender.
If you have already configured Supabase Auth emails, Dreamlit will not overwrite
your existing configuration. To switch to Dreamlit, remove the existing
Supabase Auth email setup first.
How to trigger Supabase Auth emails
When you configure auth emails through Dreamlit’s setup process, we automatically install a Supabase Auth Hook in your project. This hook listens for Supabase auth events and routes them to Dreamlit for custom email delivery. Note that Supabase Auth emails work differently than regular workflows in Dreamlit. They’re triggered by Supabase API calls from your app, which Supabase relays to Dreamlit. This means auth emails ONLY trigger when your app calls Supabase auth APIs. Your app code must invoke the appropriate method for each email type:| Email Type | Supabase API Method | When to Use |
|---|---|---|
| Password Reset | supabase.auth.resetPasswordForEmail() | User clicks “Forgot Password” |
| Magic Link | supabase.auth.signInWithOtp() | For passwordless login (magic link or OTP) |
| Reauthentication | supabase.auth.reauthenticate() | Before password change (if Secure Password Change enabled) |
| Email Change | supabase.auth.updateUser({email}) | Changing user email (if Secure Email Change enabled) |
| Confirm Email | supabase.auth.signUp() | New user registration (if Confirm Email enabled) |
| Invite Link | supabase.auth.admin.inviteUserByEmail() | Admin inviting new users |
Additional Supabase security emails
On December 3rd 2025, Supabase announced Seven New Email Templates for Supabase Auth:- Password changed - Notify users when their password has changed
- Email address changed - Notify users when their email address has changed
- Phone number changed - Notify users when their phone number has changed
- Identity linked - Notify users when a new identity (e.g.: GitHub) has been linked to their account
- Identity unlinked - Notify users when an identity (e.g.: GitHub) has been unlinked from their account
- Multi-factor authentication (MFA) method added - Notify users when a new multi-factor authentication method has been added to their account
- Multi-factor authentication (MFA) method removed - Notify users when a multi-factor authentication method has been removed from their account
How Dreamlit interacts with your database
On a high level, Dreamlit needs to know where your data lives in your database, install database triggers (for database trigger workflows), and manage some housekeeping tables in a separatedreamlit schema (just like how Supabase manages objects for you in separate schemas like auth and storage).
This way:
- Dreamlit’s AI can propose the relevant workflows for you by introspecting your database structure to understand the shape of your data and where it lives.
- You can preview your workflows with live database rows.
- You can react to new events happening in your app in real-time.
dreamlit_app database user
When you first connect your Supabase project to Dreamlit via the OAuth2 flow, Supabase creates a separate dreamlit_app database user, with minimal permissions. This is the database user that is then passed back to Dreamlit for use in your dashboard and workflows.
What Dreamlit sets up for you (via Supabase Connect)
- Create dedicated Dreamlit user — Creates
dreamlit_appwith a secure random password. - Minimal database access — Grants
CONNECT,CREATE,TEMPto thedreamlit_appuser. - Read + trigger privileges — Grants
USAGEon schemas,SELECT+TRIGGERon tables,USAGE+SELECTon sequences,EXECUTEon functions to thedreamlit_appuser. - Future-proof defaults — Sets default privileges so new tables/sequences/functions remain readable by
dreamlit_appwithout extra manual grants. - Supabase Auth access — Grants
USAGE+SELECTon theauthschema to thedreamlit_appuser and a best-effortauthenticatedrole grant for parity with Supabase defaults. - Dreamlit internal schema — Creates the
dreamlitschema and internal tables (event_log,error_log,version) used for workflow events and logging (owned bypostgres, with scoped grants to Dreamlit and Supabase system roles). - RLS-friendly reads — Adds a
SELECTRLS policy on reachable tables to thedreamlit_appuser ONLY so reads work even when RLS is enabled, without weakening your existing policies. - Auth schema table trigger management — Adds
dreamlit_auth_create_trigger+dreamlit_auth_drop_triggerhelper functions in thedreamlitschema so Dreamlit can create/remove triggers onauth.*tables (Supabase doesn’t allow grantingTRIGGERonauthtables to non-admin roles).
- We don’t write to, update, or delete rows in your application tables.
- We don’t create triggers on your tables until you publish a workflow.
- We don’t enable or modify Supabase Auth email hooks unless you explicitly opt in.
Uninstalling Dreamlit
If you ever want to remove Dreamlit entirely:- Unpublish all workflows that depend on your Supabase connection (this removes triggers/functions).
- Delete the connection in the Dreamlit dashboard. Dreamlit automatically cleans up the
dreamlitschema, auth hook helpers, Dreamlit RLS policies, and thedreamlit_approle so it’s like Dreamlit was never there.
If you have multiple Dreamlit connections pointing at the same Supabase project, we keep shared database artifacts in place until the last connection is removed.
That’s it! By connecting Supabase to Dreamlit, you can create powerful,
real-time workflows triggered by database changes — without writing any custom
code in your application.