> ## Documentation Index
> Fetch the complete documentation index at: https://dreamlit.ai/docs/llms.txt
> Use this file to discover all available pages before exploring further.
# Setup
> Just a few simple steps to get up and running. Typically takes less than 15 minutes.
With Dreamlit, there's virtually no burden on your engineering team. Setup takes about 15 minutes, and we take it from there: no engineering asks after that, beyond a few clarifying questions about your data model as needed.
**Ready to get started?** [Reach out to
us](mailto:support@dreamlit.ai?subject=Dreamlit%20for%20our%20team). If we're
a good fit, we'll send you an onboarding link where you complete the steps
below.
## 1. Share your website URL (\<1 minute)
We send an army of AI agents to understand everything publicly accessible about your brand: positioning, key features, pricing model, who you sell to, your industry, and everything your team has written. This is how the emails we write end up sounding like you. There's nothing to install, and nothing on your site changes.
## 2. Connect your data source (\~5 minutes)
Dreamlit connects with a read-only user, the same way analytics/ETL platforms like Airbyte, Metabase, or FiveTran do. You can connect any Postgres database. This lets Dreamlit:
1. Build and diagnose your user funnel and key activation metrics.
2. Hook into key events happening in real time to kick off email workflows, without having to bother your engineering team to instrument code.
The connection is **strictly read-only**. You can, and should, scope the connection accordingly (see below).
It is best practice to create a separate database user for each service that
connects to your database, following security principles of least privilege
and isolation. That way you can see exactly what each one is allowed to do,
and revoke any of them independently.
To grant Dreamlit access, we'll first need to spin up a dedicated database user. Run the following two SQL statements in your database, replacing `` with a [strong, unique password](https://1password.com/password-generator):
```sql theme={null}
CREATE ROLE dreamlit_readonly WITH LOGIN REPLICATION PASSWORD '';
GRANT pg_read_all_data TO dreamlit_readonly;
```
When prompted during onboarding, enter your connection string with the password from above to securely connect.
Check out our [technical deep dive](/docs/technical-deep-dive) if you'd like to know exactly how everything works, and why Dreamlit needs these minimal permissions.
**Requirements**
Supabase, Neon, Amazon RDS and Aurora, Google Cloud SQL, and most managed
providers qualify.
This is the built-in PostgreSQL setting that exposes the change feed
Dreamlit reads, and the same setting analytics tools such as Fivetran and
Airbyte ask for.
| Provider | What to do |
| - | - |
| **Supabase** | Already enabled. Nothing to do. |
| **Neon** | Turn on **Logical replication** in your project settings. |
| **Amazon RDS** | Set `rds.logical_replication` to `1` in a custom parameter group and reboot the instance. |
| **Amazon Aurora** | Set `rds.logical_replication` to `1` in the cluster parameter group and reboot. |
| **Google Cloud SQL** | Set the `cloudsql.logical_decoding` flag to `on` and restart. |
| **Azure Database for PostgreSQL** | Set the `wal_level` server parameter to `logical` and restart. |
| **Self-hosted or other providers** | Set `wal_level = logical` and restart PostgreSQL, or ask your provider to enable logical replication. |
Use your provider's direct database host (typically port `5432`), not a
transaction pooler host. Pooled connections cannot follow the change feed.
## 3. Set up your email sending domain (\~5 minutes)
You'll want your emails to come from your brand/domain (for example, [jane@mystartup.com](mailto:jane@mystartup.com)).
We've partnered with a service called Entri to make this seamless. In most cases, it's an automated flow that only takes a couple of minutes: sign in to your DNS provider, approve the records, done. If you'd rather add the records by hand, or want to prepare ahead, see [custom domains](/docs/configuration/email/custom-domain).
Use a subdomain you don't already send from (for example,
`mail.mystartup.com`). It keeps Dreamlit's sending reputation separate from
your existing email.
### Automatic setup (recommended)
Dreamlit can configure your DNS records for you. Just click **Verify with your DNS provider**, sign in to your provider, and authorize the changes.
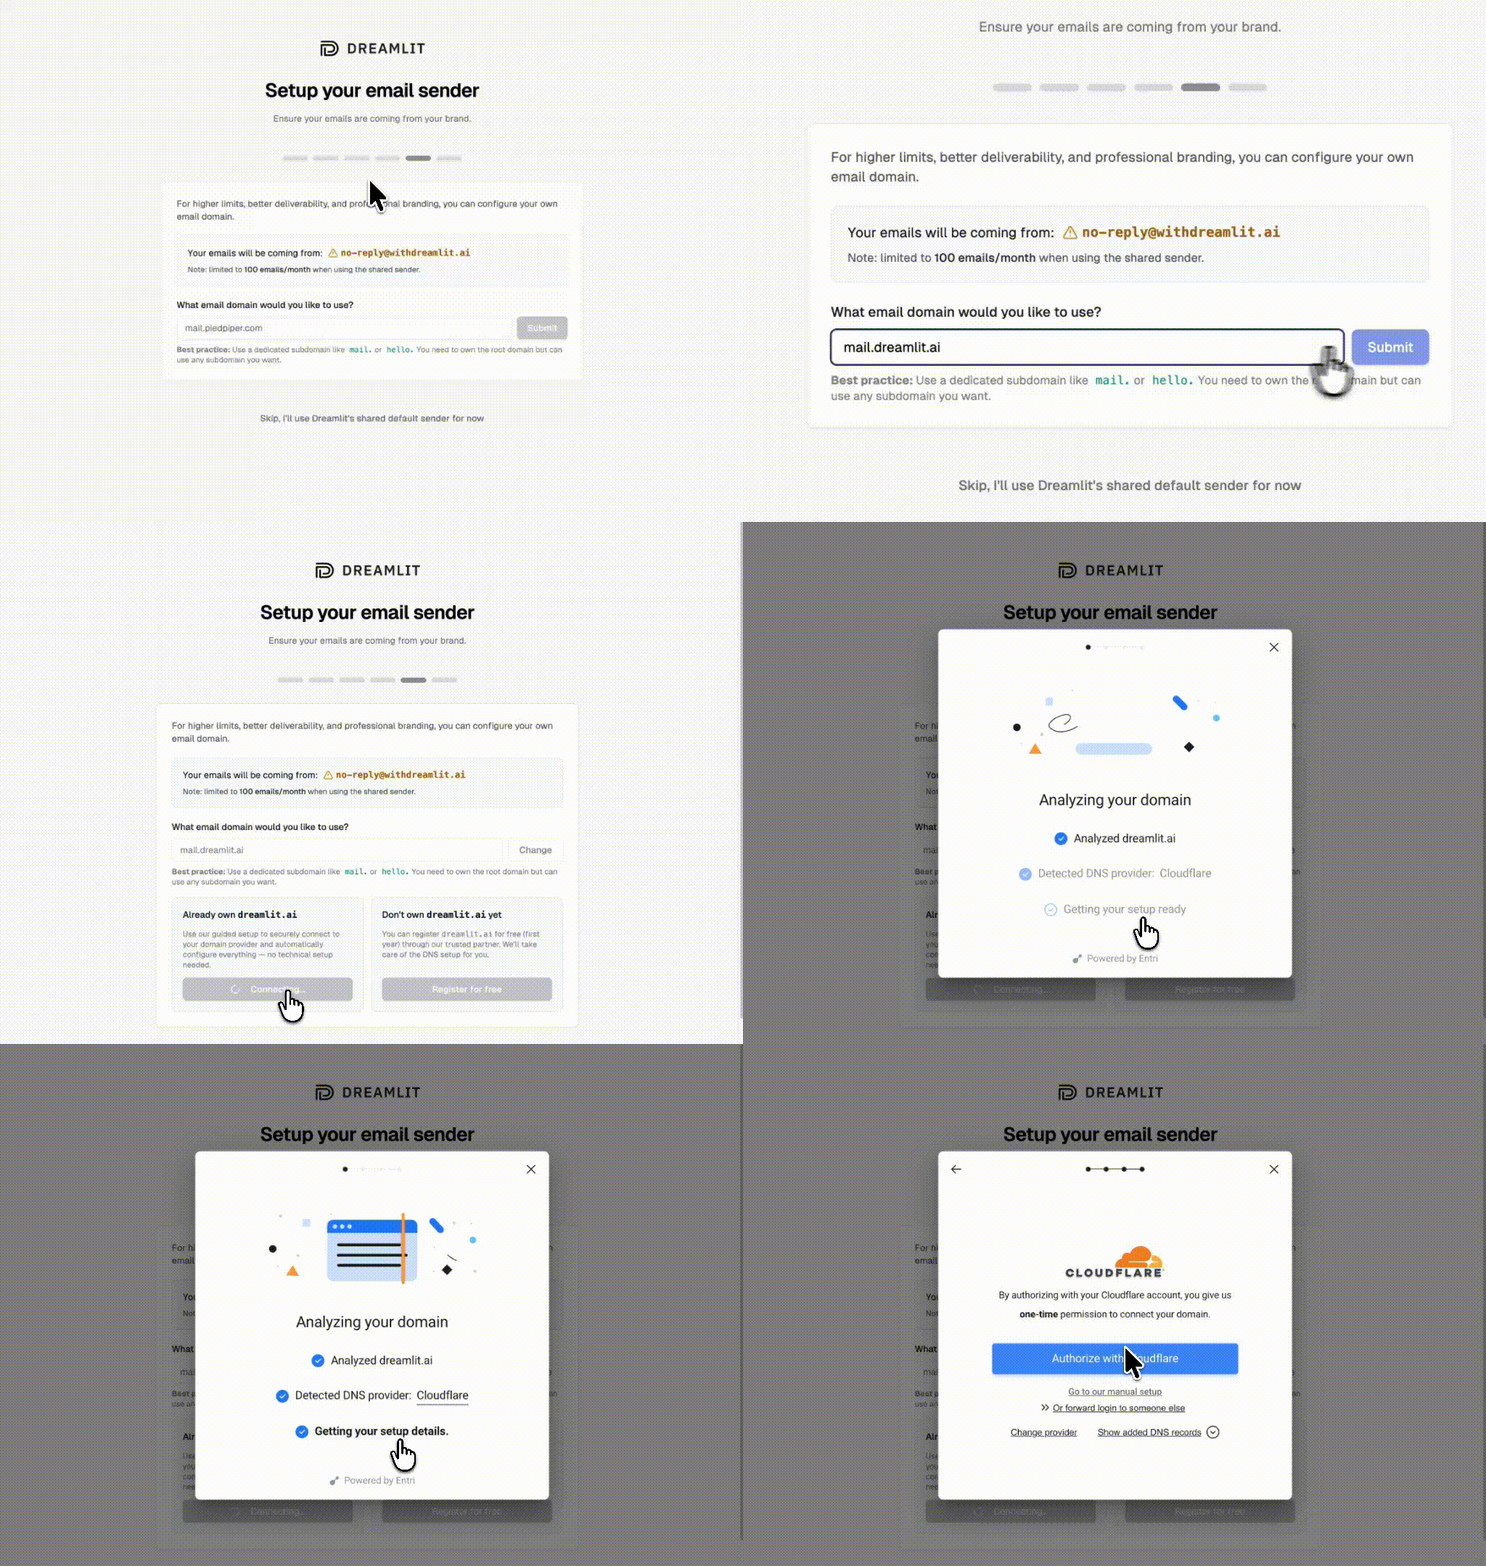 Once authorized, Dreamlit adds the required records and verifies your domain automatically. You're ready to send.
Automatic setup is available for supported DNS providers. If your provider
isn't listed, use manual setup below.
### Manual setup
If your DNS provider isn't supported for automatic setup, you can add the records manually. Dreamlit shows you exactly what to add.
After adding your domain, Dreamlit generates the required DNS records (DKIM, SPF, DMARC). Copy these to add to your DNS provider.
Log in to your DNS provider and add each record. Here are instructions for common providers:
1. Go to the DNS tab in your Cloudflare dashboard.
2. Add a new record for each entry shown in Dreamlit:
* **Type**: CNAME or TXT (depending on the record)
* **Name**: Provided by Dreamlit
* **Value**: Provided by Dreamlit
3. Save your changes and wait for propagation.
**Important for Cloudflare users**: When adding email-related DNS records (SPF, DKIM, DMARC, MX, and CNAME records),
select 'DNS Only' (gray cloud icon) and not proxied. The Cloudflare proxy must be bypassed for these records to function properly.
1. In GoDaddy, open the DNS Management page.
2. Click **Add** under "Records."
3. Enter the record details from Dreamlit, including Host (Name) and Value.
4. Save the record and wait for DNS propagation.
1. Navigate to **Domain List** → **Manage** → **Advanced DNS**.
2. Add each Dreamlit record in **Host Records**.
3. Save records and wait for propagation (usually a few minutes to a few hours).
**If Namecheap says the DKIM host is too long**
This is the 60-character **Host** limit. Do not shorten or modify the DKIM token. Remove only `.yourdomain.com` from **Host**, then try again.
Example for `dreamlit.ai`:
```text theme={null}
._domainkey.mail.dreamlit.ai -> ._domainkey.mail
```
Keep **Value** unchanged (for example: `.dkim.amazonses.com`).
Once you've added all the required DNS records, return to Dreamlit's **Email Domains** page and click **Verify** next to your domain.
If verification fails, you can confirm your DNS records are set up correctly using these commands or a free DNS lookup service like [MXToolbox](https://mxtoolbox.com/DNSLookup.aspx).
```bash theme={null}
# Check MX records
dig MX mail.mydomain.com
# Check SPF record
dig TXT mail.mydomain.com
# Check DMARC record
dig TXT _dmarc.mail.mydomain.com
# Check DKIM records
dig CNAME dk1._domainkey.mail.mydomain.com
dig CNAME dk2._domainkey.mail.mydomain.com
dig CNAME dk3._domainkey.mail.mydomain.com
```
Replace `mail.mydomain.com` with your actual domain.
```bash theme={null}
# Check MX records
nslookup -type=mx mail.mydomain.com
# Check SPF record
nslookup -type=txt mail.mydomain.com
# Check DMARC record
nslookup -type=txt _dmarc.mail.mydomain.com
# Check DKIM records
nslookup -type=cname dk1._domainkey.mail.mydomain.com
nslookup -type=cname dk2._domainkey.mail.mydomain.com
nslookup -type=cname dk3._domainkey.mail.mydomain.com
```
Replace `mail.mydomain.com` with your actual domain.
Once verified, select your domain when creating email workflows. Your emails will now come from your own brand.
DNS changes can take up to 24-48 hours to fully propagate. If verification
fails immediately, wait a bit and try again.
## 4. Schedule a call with our team
You'll have a dedicated (human) team member from Dreamlit's side overseeing and owning everything - no AI slop. To best understand your goals, positioning, and voice, we'll schedule a kick-off call so we can get started immediately.
Come with whatever you already have: existing onboarding emails, the metrics you care about, and any other context that would be helpful.
## What happens next
| When | What happens |
| - | - |
| Week 1 | Onboarding. You complete the four steps above, about 15 minutes, and join the kick-off call. We handle everything else from here. |
| Week 2 | We research and build: funnel analysis, the sequence plan, email copy and design. You review and approve, and we may ask a few questions about your data model. |
| Week 3 | We go live. Sequences run on real signups with frequency guardrails baked in. Nothing for you to do. |
| Week 4 | Your first results report: what ran, what moved, what we're changing next. |
| Every week after | You receive the report. We ship the optimizations and propose additional sequences as your results and funnel point to them. |
## Removing access
You can revoke Dreamlit's access at any time, in two steps.
**Remove the connection first.** Remove it in your Dreamlit dashboard, or ask
us to, before dropping the user. Dropping the user while the connection is
still active leaves Dreamlit's place in the change feed open, and your
database keeps holding on to change history it no longer needs.
Once the connection is removed, drop the user:
```sql theme={null}
DROP ROLE dreamlit_readonly;
```
To stop sending from your domain, remove the sending domain in your Dreamlit dashboard, and delete the DNS records Entri added wherever you host your domain.
Once authorized, Dreamlit adds the required records and verifies your domain automatically. You're ready to send.
Automatic setup is available for supported DNS providers. If your provider
isn't listed, use manual setup below.
### Manual setup
If your DNS provider isn't supported for automatic setup, you can add the records manually. Dreamlit shows you exactly what to add.
After adding your domain, Dreamlit generates the required DNS records (DKIM, SPF, DMARC). Copy these to add to your DNS provider.
Log in to your DNS provider and add each record. Here are instructions for common providers:
1. Go to the DNS tab in your Cloudflare dashboard.
2. Add a new record for each entry shown in Dreamlit:
* **Type**: CNAME or TXT (depending on the record)
* **Name**: Provided by Dreamlit
* **Value**: Provided by Dreamlit
3. Save your changes and wait for propagation.
**Important for Cloudflare users**: When adding email-related DNS records (SPF, DKIM, DMARC, MX, and CNAME records),
select 'DNS Only' (gray cloud icon) and not proxied. The Cloudflare proxy must be bypassed for these records to function properly.
1. In GoDaddy, open the DNS Management page.
2. Click **Add** under "Records."
3. Enter the record details from Dreamlit, including Host (Name) and Value.
4. Save the record and wait for DNS propagation.
1. Navigate to **Domain List** → **Manage** → **Advanced DNS**.
2. Add each Dreamlit record in **Host Records**.
3. Save records and wait for propagation (usually a few minutes to a few hours).
**If Namecheap says the DKIM host is too long**
This is the 60-character **Host** limit. Do not shorten or modify the DKIM token. Remove only `.yourdomain.com` from **Host**, then try again.
Example for `dreamlit.ai`:
```text theme={null}
._domainkey.mail.dreamlit.ai -> ._domainkey.mail
```
Keep **Value** unchanged (for example: `.dkim.amazonses.com`).
Once you've added all the required DNS records, return to Dreamlit's **Email Domains** page and click **Verify** next to your domain.
If verification fails, you can confirm your DNS records are set up correctly using these commands or a free DNS lookup service like [MXToolbox](https://mxtoolbox.com/DNSLookup.aspx).
```bash theme={null}
# Check MX records
dig MX mail.mydomain.com
# Check SPF record
dig TXT mail.mydomain.com
# Check DMARC record
dig TXT _dmarc.mail.mydomain.com
# Check DKIM records
dig CNAME dk1._domainkey.mail.mydomain.com
dig CNAME dk2._domainkey.mail.mydomain.com
dig CNAME dk3._domainkey.mail.mydomain.com
```
Replace `mail.mydomain.com` with your actual domain.
```bash theme={null}
# Check MX records
nslookup -type=mx mail.mydomain.com
# Check SPF record
nslookup -type=txt mail.mydomain.com
# Check DMARC record
nslookup -type=txt _dmarc.mail.mydomain.com
# Check DKIM records
nslookup -type=cname dk1._domainkey.mail.mydomain.com
nslookup -type=cname dk2._domainkey.mail.mydomain.com
nslookup -type=cname dk3._domainkey.mail.mydomain.com
```
Replace `mail.mydomain.com` with your actual domain.
Once verified, select your domain when creating email workflows. Your emails will now come from your own brand.
DNS changes can take up to 24-48 hours to fully propagate. If verification
fails immediately, wait a bit and try again.
## 4. Schedule a call with our team
You'll have a dedicated (human) team member from Dreamlit's side overseeing and owning everything - no AI slop. To best understand your goals, positioning, and voice, we'll schedule a kick-off call so we can get started immediately.
Come with whatever you already have: existing onboarding emails, the metrics you care about, and any other context that would be helpful.
## What happens next
| When | What happens |
| - | - |
| Week 1 | Onboarding. You complete the four steps above, about 15 minutes, and join the kick-off call. We handle everything else from here. |
| Week 2 | We research and build: funnel analysis, the sequence plan, email copy and design. You review and approve, and we may ask a few questions about your data model. |
| Week 3 | We go live. Sequences run on real signups with frequency guardrails baked in. Nothing for you to do. |
| Week 4 | Your first results report: what ran, what moved, what we're changing next. |
| Every week after | You receive the report. We ship the optimizations and propose additional sequences as your results and funnel point to them. |
## Removing access
You can revoke Dreamlit's access at any time, in two steps.
**Remove the connection first.** Remove it in your Dreamlit dashboard, or ask
us to, before dropping the user. Dropping the user while the connection is
still active leaves Dreamlit's place in the change feed open, and your
database keeps holding on to change history it no longer needs.
Once the connection is removed, drop the user:
```sql theme={null}
DROP ROLE dreamlit_readonly;
```
To stop sending from your domain, remove the sending domain in your Dreamlit dashboard, and delete the DNS records Entri added wherever you host your domain.